Getting started with BBEdit
So you have purchased a copy of BBEdit or have the free trial version. Locate it on your hard drive, and double-click the icon to launch BBEdit. The icon should bounce in the Dock until BBEdit is loaded and ready to go.
Once BBEdit is running and the icon is visible in the Dock, hold down the Control key and click on the BBEdit Dock icon. A contextual menu will appear. Move the cursor up to Options
, and note that in the fly-out menu there is the option to Keep [BBEdit] in Dock
. Select this option. Now BBEdit will be available to you at all times. Your life is already better, and you have barely started using BBEdit.
You can thank me later, or just send me $500. OK?
If you have never created an HTML page before, here is a quick tutorial.
The BBEdit way
Instead of starting with a blank text document, BBEdit can create our basic HTML page so we can get right to work. Choose File ⇒ New ⇒ HTML Document …
Instead of popping open a new blank window, BBEdit presents a dialog box with a few choices.
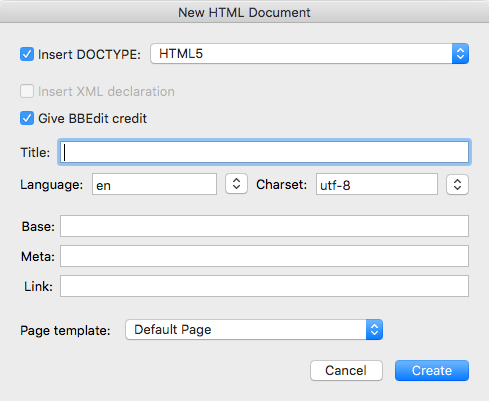
We dealt briefly with the DOCTYPE above. The HTML5
document type is the latest (and best, IMHO), but BBEdit allows you to choose other legacy document types (or no document type) if you are working on a project where you need to match the existing code base.
The Title
is the text that appears in the browser’s title bar. It is not mandatory, but it is really, really handy, and is therefore highly recommended. Try it now by typing BBEdit rocks!
in the Title field.
Leave the Language
as English (en
) unless your page content is in a different language, and the Charset
(character set) as utf-8
. Don’t worry about the Base, Meta, Link, or Page template options for now.
Hit RETURN or click Create
.
<!DOCTYPE html>
<html lang="en">
<head>
  <meta charset="utf-8" />
  <title>BBEdit rocks!</title>
  <meta name="generator" content="BBEdit 14.6.1" />
</head>
<body>

</body>
</html>
Note that BBEdit created a basic HTML document for you, containing the bare bones of a valid HTML page. Whereas before you started with a blank document and added this code yourself, BBEdit gets you started on the right foot with the skeleton of a valid HTML document.
All you have to do is add your content and save. By the way, when you save your document, you will notice that instead of the .txt
filename extension, BBEdit has already filled in the .html
filename extension.
As before, BBEdit applies different colors to tags, attribute names, attributes, etc., so you can easily differentiate among page elements at a glance.
Now put the cursor on the blank line between the body tags in your code window, and type:
My first HTML page in BBEdit.
Choose Markup ⇒ Preview in BBEdit to admire your work so far.
Not to bag on CodeKit, HammerForMac, or other similar workflows, you don’t have to build
your web pages before previewing them. You can even preview them without saving them.
Checking your work
One of BBEdit’s strongest features is that it allows you to check your work. One of the checks BBEdit performs is to see if your HTML code is valid.
Each of the HTML document type specifications has code constructions that it allows, and others that are not allowed. BBEdit looks at your document type declaration and applies the appropriate code validators.
In this case, we are using HTML5 (document type html
).
Choose Markup ⇒ Check ⇒ Document Syntax to validate your code.
If everything is correct (and it should be, at this point), BBEdit will display a popup window.
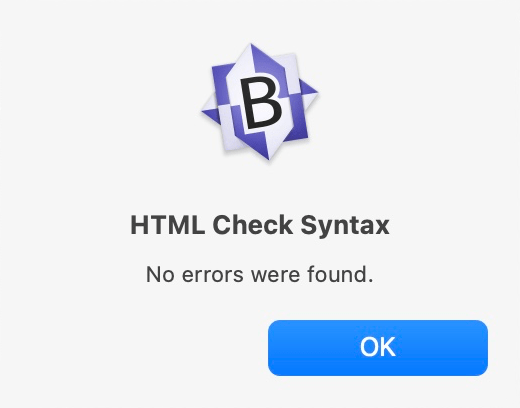
Validation is important because valid HTML loads faster than invalid HTML, about which the browser has to guess and make assumptions. Validation becomes increasingly important on complex pages, because you can easily miss or mistype a tag, which could throw off the way the document looks in a browser, and it will definitely throw off your attempts to add code later, or modify the existing code. Plus, it’s important to have pride in our work, and valid HTML is a great way of showing that you take pride in how you present yourself to the world.
For a more authoritative treatment of validation, see Why Validate?
by the World Wide Web Consortium (W3C).
Fun activity
Here’s a fun activity that you can do anytime you need to feel superior while you’re procrastinating on some project.
- Visit a website in your browser — preferably one of those that presents itself as insufferably superior in web technology.
- Download the source code of the page to your computer. I like to download it to the Desktop, and call the downloaded file
tossme.html
. - Open the downloaded source code file using BBEdit.
- Run the BBEdit syntax checker and watch the errors and warnings pile up.
- Shake your head and mutter to yourself,
Some people’s kids.
For extra fun, copy the listing of errors and warnings and paste it into a new BBEdit text document. Make any edits you think are appropriate, and then e-mail the list to the webmaster. Don’t worry: They won’t respond to you.
Adding HTML tags
Even though the page you just created has valid syntax, it’s still not as good as it could be. For the final touch, you need to add <p> (paragraph) tags around the text. Here’s how to do that:
- Select
My first HTML page in BBEdit.
in your code window. - Choose Markup ⇒ Edit Markup …
- BBEdit will present a pop-up window that contains a field where you can type an HTML tag.
- Type
p(without the opening<or closing>characters. - Then hit TAB or RETURN, or click
Apply
. - The pop-up window will then expand to allow you to set ID or class attributes (about which more later). There is none for now, so hit RETURN, or click
Apply
. - BBEdit will wrap the selected text in
<p> … </p>tags.
Your code will look like the code shown below. Your page will display the same (for now), but before, the browser was guessing how to present that line of text. With the <p> tags, it knows how to present the text. This isn’t a huge deal on a page this size, but the more complex your pages and sites become, the more you will need to have both valid and well-formed code.
<!DOCTYPE html>
<html lang="en">
<head>
<meta charset="utf-8" />
  <title>BBEdit rocks!</title>
</head>
<body>
<p>
  My improved HTML page in BBEdit.
</p>
</body>
</html>
If you select multiple lines separated by a blank line, BBEdit will interpret each block
of lines as a separate paragraph, and wrap each in its own p tags.
Another way BBEdit helps you create valid code is through context-aware tags. This means, if it would be invalid to insert a given tag at the insertion point, BBEdit will not offer it as an option. For example, if you start with the Basic HTML Page
above, and try to insert the <figcaption> … </figcaption> tags directly inside the <body> … </body> tags, BBEdit will recognize that this is invalid. You can still type the <figcaption> … </figcaption> tags yourself, but BBEdit will flag them during validation. On the other hand, if you want to insert the <figcaption> … </figcaption> tags inside a pair of <figure> … </figure> tags, BBEdit will be happy to help you out.
There is another reason why correct syntax is important: BBEdit constantly monitors your HTML pages, so if you have a syntax error in the code above where you are entering a new tag using the context-aware feature, BBEdit will not suggest any tags. You must fix the syntax of the page first, although you can still type in the tag manually.
In the example above, you selected text and applied the HTML tag. However in practice, you will be more likely to have the cursor at the insertion point where you want the new HTML tag to appear (that is, with no text selected). Either way, BBEdit is there to help you insert your HTML tags.
You can use these techniques to add any valid HTML tag (or pair of tags) to your pages.
Adding attributes to HTML tags
Also in the example above, I glossed over another nice BBEdit feature, which is that while you are creating new HTML tags, you can also insert ID and class attributes.
Quick primer: Using ID and class attributes
In the olden days, it was more or less up to the webmaster (that’s you) whether to use IDs or classes in HTML tags. We old-timers even had the name attribute, way back then. Now IDs and classes are used in a more structured way.
IDs must be unique on a page, and are usually reserved for HTML tags that are going to be treated as a reference or as a container. For example, you might have an HTML tag pair along the lines of <div id="myVideo"></div>, where the unique myVideo
ID attribute specifies exactly where your JavaScript code is to insert content on the fly; a video, for example. You can also use IDs to link to specific sections within a page, such as <a href="/index.html#top">Back to Top</a>, where top
is the unique ID of a location of the page you want to target with your link.
Classes need not be unique, and are most often used for styling by applying CSS rules.
Unless you are building fairly complex pages, then, you will typically use classes a lot, and IDs not so much. For example, on these pages, classes are used extensively to help define the look and feel of the content, while IDs are used in the menu system to allow JavaScript to apply the CSS highlight style to the active section, and to enable the fancy Back to Top
button that appears like magic once you scroll down the page.
There are three ways to add attributes to tags in BBEdit.
- Click in a bare tag, and type them in yourself. Bo-ring!
- Or, click anywhere in a tag (bare or not), select Markup ⇒ Edit Markup … from the BBEdit menu, and fill in the
id
and/orclass
fields to your heart’s content. - Or, insert the cursor where you want a new tag, select Markup ⇒ Edit Markup … from the BBEdit menu, type the tag you want and press TAB or RETURN, and then type in the ID and/or class attributes. As mentioned above, if you have clicked in a section of your document where a tag is not allowed, BBEdit will not auto-complete the tag name.
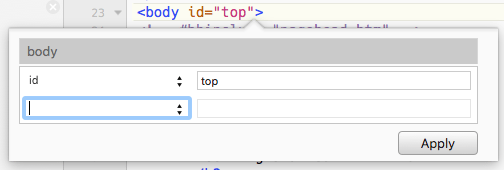
id of topto the
body tag
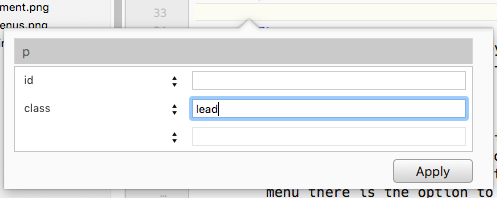
class of leadto the
p tag
The results:
<!DOCTYPE html>
<html lang="en">
<head>
<meta charset="utf-8" />
  <title>BBEdit rocks!</title>
</head>
<body id="top">
<p class="lead">
  My improved HTML page in BBEdit with attributes.
</p>
</body>
</html>
You can see in the examples above that BBEdit pre-fills the dialogue box with the most common attributes you will use. But, there is always another unassigned field below the default fields where you can type in any attribute name and value you want.
Shortcuts, AKA BBEdit Preferences
In this last example, BBEdit took some of the load off of us by 1) providing a valid HTML5 shell into which we could add our content, 2) by applying opening and closing tags to a text selection, and 3) by helping manage tag attributes. So far, so good, but with BBEdit we can do a lot better.
The way we do that is by using keyboard shortcuts instead of the menu system. Don’t get me wrong; the menu system is great when you’ve been coding for so long that you can’t see or think straight. But for real productivity, keyboard shortcuts are the way to go.
BBEdit has built-in shortcuts for many common menu selections, and you are welcome to use them if they work for you. If like me you like the shortcuts but prefer different key combinations to invoke them, BBEdit has you covered.
In the example above, you can see that Minimize Window
, which normally has the keyboard shortcut of Command M, now has no keyboard shortcut defined. Minimizing the window in other OS X apps may be helpful, but minimize BBEdit? Please, give me a break.
In this case, Command M has been reassigned to another menu item: Edit Markup …
.
To change the key combination you use to invoke any given menu item shortcut, double-click on the existing shortcut.
In the example above, Preview in BBEdit
, which is currently set to Control Command P, is ready to changed to something else. If the new key combination you request is in use by another shortcut, BBEdit will alert you, and give you the chance either to retain the existing shortcut, or replace it with your new mapping.
You will also note that there are blue checkboxes next to some of the menus and menu items. These indicate menu items you can turn off completely, so you never see them. If the checkbox is grayed out, that means the associated menu item is always displayed.
In the example above that added the <p> … </p> tags using the cursor and menu system, with keyboard shortcuts you could have selected your text, hit your keyboard shortcut for Edit Markup …
, typed p and hit RETURN twice to achieve the same end result much more quickly than going through the menu system.
Palettes
So you can control BBEdit through the menu system and/or through shortcuts, and there is one other option: Choose Window ⇒ Palettes ⇒ HTML Markup Tools
If you have enough screen real estate, palettes are great. You can position them wherever you want and click on a palette item to invoke that option. This is especially helpful when creating new tables, checking page syntax, and checking page links.
Lists and tables
In addition to shortcuts for normal
HTML tags, BBEdit has a couple of special tag handlers for lists and tables.
- First, Markup ⇒ Edit Markup … will assist you if you want to type the list or table tags (with or without attributes).
- Second, Markup ⇒ Lists ⇒ … will insert a starter set of tags for the list you wish, while Markup ⇒ Tables ⇒ Create Table Shell … will build the table structure for the size table you specify, and fill it with placeholders if you wish.
- Third, if you have
bare
table data (which you might have pasted in from Microsoft Excel, for example. Not only that, but BBEdit will allow to to specify if the first row is a header, and it will wrap the header row(s) and the body row(s) in the appropriatetheadortbodytags.
BBEdit does not insert caption or tfoot tags for you when creating tables, but if you click in the correct location in your table code, BBEdit will understand the context and help you insert them semi-automatically.
When it comes to manipulating tables, Dreamweaver has some great time-saving features. If you manipulate a lot of existing tables, this is one feature you might find worthwhile.
To augment the functionality of your otherwise static tables, check out these table helpers.
Formatting HTML
You don’t have to be anal-retentive to appreciate BBEdit’s ability to reformat HTML code — but it couldn’t hurt.
BBEdit offers seven different formatting modes and three options under Markup ⇒ Utilities ⇒ Format …
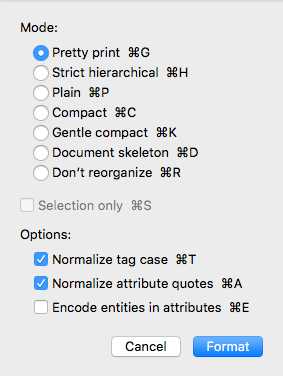
You will have to experiment to see which suits your temperament, but once you settle on one, you can invoke it with Markup ⇒ Utilities ⇒ Format, which has the keyboard shortcut Command Option Shift F.
BBEdit’s formatting feature is great to apply to someone else’s code before you wade in, but it also comes in really handy if you get lost in the code of a complicated page.
For example, if you are missing a closing tag for certain elements, reformatting will reveal this by increasing the indents at the location of each missing closing tag.
If you have an extra closing tag or two, reformatting will allow you to spot this quickly because the code at the bottom of your page — which is supposed to be indented — will all be flush left.
Between keeping your HTML formatted and BBEdit’s syntax checker, you will be able to grok you code a lot more quickly and easily.
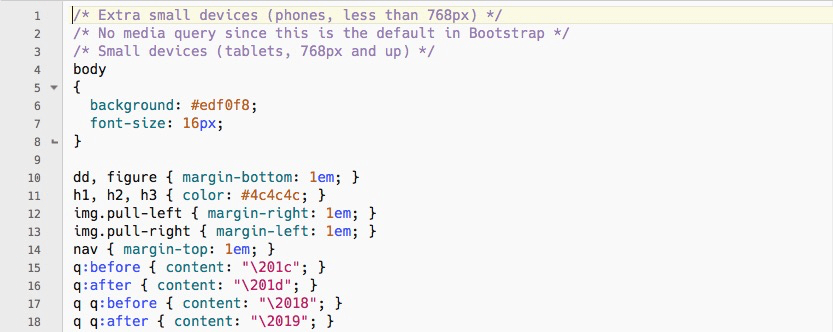
Formatting CSS
Although BBEdit does not format CSS along with HTML code, you can click anywhere in your CSS block and style it separately. This works both with CSS within <style> tags in your HTML document, and in separate CSS files. Choose Markup ⇒ CSS ⇒ Format
One of the current rages is to condense commonly-called files such as external style sheets, and there are any number of ways to do this. Within BBEdit, the easiest way is to use Markup ⇒ Utilities ⇒ Optimize to remove unneeded space from your external CSS. This is straightforward, utterly easy, and within a couple of bytes of the more sophisticated methods. Should you ever need to edit your CSS, simply apply Markup ⇒ CSS ⇒ Format, make your changes, and then re-optimize.
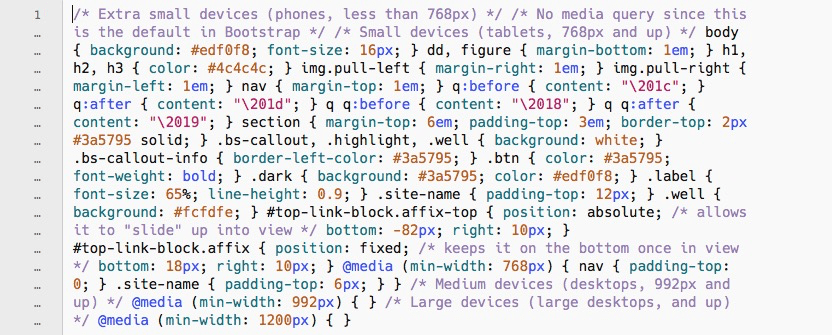
Note that BBEdit’s generic
Optimize function leaves comments and some other elements that the true CSS minimizers remove. In most cases, the difference in file size is minimal, and leaving the comments allows you to have just one CSS file, rather than one with all the comments (for editing) and a minimized one without (for publication).
The only problem you may run into with this technique comes when you have a caching set up (including Cloudflare), as these services may not recognize that your file has changed. You can either purge the cache by logging into the admin section of your service, or by adding a suffix to your CSS call that gives it a unique name, which alerts the cache service that the file has changed. So, instead of naming your CSS file bbedit.css
, you would use something like bbedit.css?version=20221020.
If you really want to get carried away, you can set up automatic versioning.
Don’t forget to go into your css folder once in awhile to clean out the old versions, though!
Exotic versioning schemes seem to me to be more trouble than they are worth for most website projects, though, as when you are developing your project, you will not (well, should not) have caching in place, and after you deploy your project, you probably will not be making that many changes to the CSS. When you are not changing your CSS file that often (if at all), it is a simple matter to change the ?versionnumber in the appropriate <link> in your metatag include, and be done with it.
Formatting JavaScript (and other) files
BBEdit does not format JavaScript, Python, or perl code (among others), so you’ll need to use an external helper. I prefer online tools such as Beautifier.io, because setting up local instances can harsh my mellow, and then I have to maintain and update the files needed that make local instances possible.
Backup files
BBEdit has a preference that allows you to have it create backups of your files as you edit them. Think of it like Time Machine® just for your BBEdit files. Even if you use it once a year, it could save you a lot of time and aggravation.
At this point, you have the basics of using BBEdit for very simple pages and sites. Now it is time to see how BBEdit can help you as your project grows.